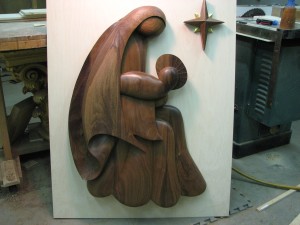
I didn’t think I’d be revisiting this carving again. But just today I got a call from the Pastor and he had a request. Turns out he had the small sample I had done when I proposed this job but he gave it away. He had it mounted on his office door and everyone loved it. Especially the donor for the large statue. Well the Pastor felt he ( the donor) should have the small carving as a memento to keep at home with him.
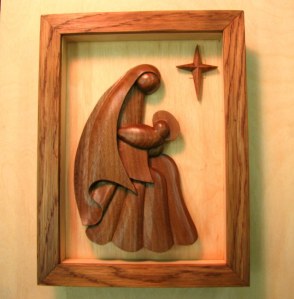
Now the Pastor was missing his carving and wanted to replace it with another. But this time we decided to make a miniature of the full size statue for his office. This way he could set it on his desk as you would a photo in a frame,, or mount it on the wall, again , as a picture frame. The plan is to mount this carving, done in the same Walnut as the full size carving, on the same style background with some depth to it as if a shadow box and frame it with some Oak as the original was finished.
I started it tonight after dinner and at this point it’s only roughed in. As you can see the baby needs to be carved and then the rest of the piece gone over. It’s 6 inches in height and the thickness of the wood is just under 5/8ths inch. I think this is interesting for several reasons. The topic was brought up at one time in the comments as far as how thick a carving should or could be to achieve “levels” and a look of depth. The natural thought is that thicker is better. Not always. In this case having a thicker piece of wood would not look good considering the size of the carving. Any thicker than this and I might as well carve a 3D piece.
The other topic that came up recently as well here on the blog was finishing a piece. Not what type of oil, poly, wax etc. to use but how to achieve a smooth finish on a carving prior to the sealing steps. The idea of a special chisel was considered as being the solution. I disagreed. I tend to think that the best chisel to clean up a carving is the very tool that made the cuts. It’s only natural since the chisel made the cut in a particular curve so use that same chisel to clean up after itself. Now in some cases you will use a similar chisel where you need to flatten ridges created by a deeper chisel,, but in most cases, the same chisel does the job just fine.
Now on this carving at this stage, it’s only roughed in. Lines need to be addressed, stop cuts cleaned and a general going over to smooth out the main surfaces. As well as finish carving the Baby and Halo of course. But here you get the idea of the general look of my pieces as I’m working through them. Since this is so small it’s easy to keep the piece clean as you go. And truthfully, a piece this small doesn’t take much to clean up as you go in addition to the fact that once it’s roughed in, it’s pretty close to the final size. Not much more can or will be taken off. Once my roughing in is completed I’ll resharpen my chisels that I used and go over it lightly to blend odd cuts ,smooth the facets , shear the stop cuts .
The thing is, carving clean should really start at the beginning as you’re setting in stop cuts. Paying attention to just how deep you set them with a mallet or by hand so they aren’t noticeable when you are finished. You don’t want to see the lines in the wood. The stop and paring cuts should meet at the exact same depth and point. When making the paring cuts to the stop cuts be careful not to over shoot the cut and leave chisel marks in the vertical sections. These areas are the most difficult to clean up well as opposed to the smoother curved surfaces of the rest of the carving. It’s in the bottom corners where the messes tend to be. Carve cleanly in these areas as it’s easier to finish it now than go back over the whole piece picking out fuzzies for hours on end. Do it right the first time , as they say, because their is never enough time to do it the second time. It’s just good carving practice to do it this way.
 Here you can see the overall size of the piece coming in at just 6 inches.
 Here you can see the relative thinness against my .5mm mechanical pencil. When areas get this thin delicate cuts and sharp tools are the way to go. Also, rather than making a truly vertical cut and risk the thickness of the chisel breaking off a thin piece such as this because it’s acting as a wedge, make a slanted cut instead. Once the waste wood is removed you can then shear down and make a clean vertical cut without pressuring the delicate detail you wish to keep. And yes, there is some cleaning up to do on some vertical areas where the grain tore out. Sharp chisels and careful shearing cuts will take care of these details with the final passes. Considering the scale,, and when you blow up the photo they don’t look very good,, but some of the stuff you see is the size of a grain or two of sugar. So,, not all that bad.
 The same delicate area from the opposite side. The amount of wood at the very tip of the veil seems to be only a few slivers of wood grain. Easy to break off. The shadows are important to follow when carving. I generally use two lamps as I’m carving so I can keep playing with the shadows to see how the carving will read. The other reason for two is that many times your hands or tools are blocking the light as you’re making particular cuts and the second lamp illuminates your path if you happen to be blocking the light from the other lamp. Using only one lamp you’ll find yourself constantly moving it from cut to cut just to have the proper lighting. You need to see the shadows as well as illuminate the cut.
 And why are these pictured? Well, just for fun . They were sitting on the bench since I made them today and figured I’d include them as well. The center one was an existing brush, in terrible condition and I restored that one by removing the knot and replacing it with a new one and cleaning up the rest of the handle. The other two I made the acrylic, spun them on my lathe and then fitted knots in them as well. These are three entirely different Badger Hair Knots.
I’ll post more photos of the carving as I get ready to sand it so you can see how I clean up a carving. After that point it’s sanding it, sealing it and then making the small star and frame. Should go quickly considering the time I have in it up to this point.
Stay tuned.
Go to page : 1 2
 The completed carving with the sealer. Seeing it in my hand gives you a sense of the scale of the piece.
 I much prefer the look of a Satin finish as opposed to a gloss. Gloss I feel tends to cheapen the look by making a piece look embalmed like some craft show decoupage cr*p and in the process killing the beauty of the wood because of the gloss. Satin allows you to still see the wood giving it a soft sheen so you know it’s finished, but still looks silky. Even with the strong light so close the wood still comes through.
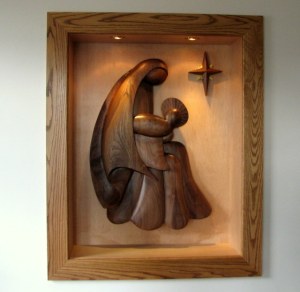
 Here you can see the niche concept by doing a shadow box type frame.
 Came out fairly close. Not that it matters one bit, but the scale on the Oak frame would make this closer to 8 inches than the 6 inches on the full size piece. Doesn’t matter as this is just a desk or wall mounted “3D picture frame” and not a scale model that has to be totally accurate. I guess it’s just my nature showing as I was curious as to how close I came. Silly. The final interior dimensions came in at exactly 5 X 7,,, just like a photo frame. I’m happy.


recent comments