Tree part 5. It’s done.

I got the tree wrapped up a day or so ago. But as is usually the case I keep picking at it until it gets shipped.  As it stands there are just over 100 leaves and I have to admit that at this point I don’t want to see any more for a while!  Here are a few random shots for you to see.

I think that at this point you can find your way around the tree so it will be just photos.

IMG_3730


IMG_3731


IMG_3724


IMG_3712


IMG_3728


IMG_3729


IMG_3718


IMG_3726

Capitals

Here is the remnants of an ongoing project that was on,, then put on hold, then off, and now ( after nearly a year) they want to start up again.  If you buy a ticket, then get off the ride you can’t get back on at the head of the line. Unfortunately that’s where this job ended up. At the end of the line. I can’t very well stop other projects already in the works since the time they cancelled this job several months ago and put current projects on the back burner. The freight train keeps rolling along and it doesn’t stop.

But I thought you might enjoy seeing some of the other things I had been working on . A shame as they were coming along nicely until the plug got pulled. All that work………..

IMG_3679 There are a total of 8 panels which will form two capitals. Here they are just mocked into position .

IMG_3678

IMG_3673

IMG_3675

The first one in this row is out of the Duplicator and hasn’t been cleaned up yet.

Tree carving part 4

I was anxious to start on the leaves as I know this can add some life to the piece.

Using a router I first made small cutouts spaced around the edges of the leaves. The router makes quick work of this by removing material quickly rather than doing it all by hand. I still have to go in with a chisel and clean them up but removing stock is the only objective here.

I then laid in lines for the main veins as well as  lines that extend from the center vein to the edge. These lines are first cut in with a V tool then using flatter chisels the cut is rounded over onto the surface of the leaf. I then use a large gouge to cut a cove from the cutouts along the edge towards the center of the leaf. Doing this adds some movement and interest to the leaf.

IMG_3641

Off to the lower right in this photo is a nearly completed leaf. The others show the initial cuts with the V tool and I will focus in on the one at the center top.


IMG_3642

Here are the cutouts as well as the main vein and the smaller ones that lead to the edge of the leaf.


IMG_3643The veins have bee radiused into the surface and the large gouge creates a cove from the cutouts towards the center vein.


IMG_3646

IMG_3645

IMG_3644

Showing the leaf lit from different angles reveals the undulations created by the veins and coves.


IMG_3638

IMG_3639

IMG_3640

And a variety of leaves in different states of being carved,, sanded,, etc.


Tree Carving part 3

Over the Holidays I was able to get at least some work done. I recarved the entire upper left section of the tree giving it a more graceful sweep upwards. Originally this area looked too square and ‘blocky’ to my eye.  Also I got the remainder of the branch and leaves roughed in.  As the tree extends all the branches naturally get much thinner and the leaves change direction subtly. I wanted the end of the branch to appear a bit lighter and less bulky than the main area of the tree.

I also got the baby chicks in their nest.  Like my own children , one is chattering away calling for food or Mom and the other is quiet and sitting contentedly.

The adults have also been roughed into place. Here , Mom is looking back towards the nest with here babies and Dad is sitting on a branch all plumped up surveying his domain and keeping watch.

This family of birds housed in this tree sounds like my home at one time!

IMG_3626

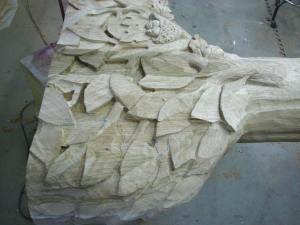
Here is the area that I recarved. It now sweeps more gracefully and isn’t as blocky looking to my eye.

IMG_3630
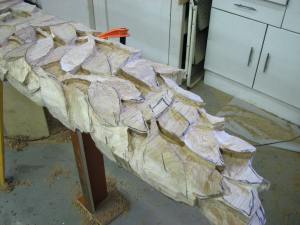
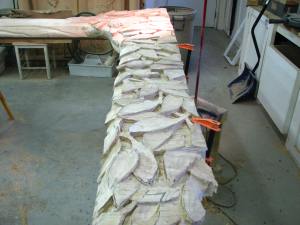
Looking back across the arch of the branch where all the leaves have been roughed into place. About half way across this span is where the adult birds are sitting. The nest is very near the main trunk.

IMG_3629

The end of the branch where the leaves and stems become lighter looking and change direction a bit.

IMG_3637

IMG_3636

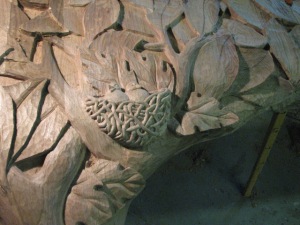
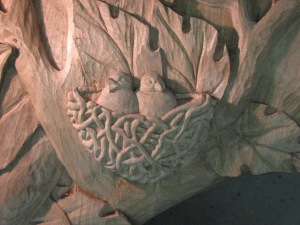
The chicks sitting in their nest.

IMG_3632

The adults with the Mother looking back towards the nest and the father looking out for them.