A good trade

A friend stopped by my shop the other evening. He knew I collect straight razors and brought over his collection for me to see. It turns out he had previously decided to give me one which was the one I was drooling over as I dissected his collection. Well,, I believe he had ulterior motives for giving me the razor. He primarily collects knives, especially  Sunfish patterns. So he hands me a well worn Sunfish whose Celluloid scales have seen better days. Actually celluloid can break down quite quickly for no apparent reason. He knew I made my own material for scales on straight razors as well as turning custom brushes so he “wondered” if I could make up something for his deteriorating knife. I told him it wouldn’t be original,, but he didn’t care. His response was that it would be a carry knife and not a true collectable. And , he reasoned,, it will probably be better than what it is now.

So once he left I brought out my resins,, colorants ,, etc. and set about making up a color that would first appear as if it was of the time period and also blend with the brass of the bolsters of the knife. I then  removed the badly deteriorated scales, cleaned up the liners and prepped it for new scales.

The next day I had a sheet that I could cut up and turn into scales for his knife. I didn’t remove the pins. Instead I made a template and fitted my new scale material around the pins when at the same time kept within the length dictated by the bolsters. If you ever want to know the hardest way to do something ,, ask me!

Anyway,,I got the new scales fitted ( each side was different so a pattern wasn’t a consideration) sanded to the proper thickness and then polished them to what you see here.

The photos tell the rest of the story.

I hope he likes them. I think they blend well with the rest of the knife, the brass , and they seem to have a old school celluloid look to them. The photos don’t show how they really sparkle with the brass showing through the translucent scales I made.


Here you can see how the original Celluloid has very quickly started to blister and deteriorate. After 100+ years it seems a shame that this happened.


After I removed the old scales the brass liners remain along with the pins.  The brass has also been damaged by the deterioration of the celluloid as well. Regardless, I polished up the brass to act as a reflecting plane behind my translucent scales to add a bit of brilliance to them.


Granted ,, It’s a bad photo,, but you can make out the condition of the knife overall.


Here are my scales fitted and polished.


Another view,,,,,,,,


The knife with an extra piece of the scale material I made.


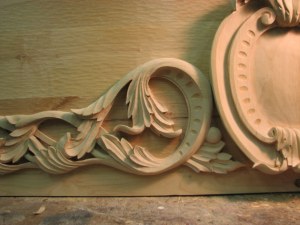
Medallion and Acanthus leaves

Well I wrapped this up as it is being picked up tomorrow, well , considering it’s 2 AM ,, today!

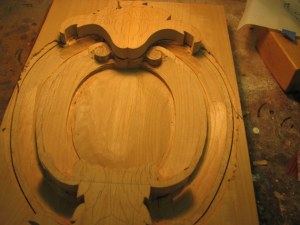
The medallion was interesting to do. I was able to do quite a bit of the roughing out with a router. This though required several steps in a succession of depths and cuts. Since this is basically  one bowl inside another I needed to be able to keep the references from one to another as well as keeping the curved shape in the center. What I did was establish the center first. Doing this allowed me to determine the depth of the outside edge of the center as well as the height of the center since this area is essentially a convex shape. I was able to set the height of the “bulge” of the center as well as set the depth while at the same time define the outside edge of this area. Since I wanted this area to be the deepest level I was then able to establish the outside line of the inner “bowl” which was a bit higher than the inner convex shape. Once I had this I was then able to determine the depth of the outer “bowl” and determine it’s depth. You’ll notice I didn’t cut out the entire shape but I did use the band saw to cut in the outside perimeter of the entire shape but I didn’t cut it free. I wanted to keep the additional material to provide a base for the router to work from. Had I cut out the shape first I wouldn’t have been able to use the router to do much of the roughing out work.

I not only used a small router bit to define the outside lines of the bowls but I also used a bullnose type bit to clearance out much of the curves of the bowls themselves. Once all the router work was done I completed the cuts to have the final shapes.

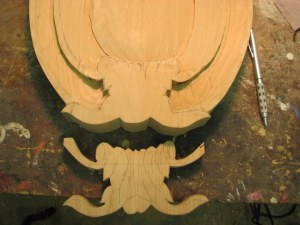
One thing I did do was not to cut out the top and bottom profiles. I knew I need to add wood to these areas to provide material to carve the flowers and the lower acanthus leaves. To solve this I first made up a section of wood that I would add and drew the flower and lower design on to them. I then cut them out in preparation to glue them to the surface. But I first used the cutouts to transfer the profile to the main body of the carving. Doing it this way instead of cutting out the main body and trying to add the cutouts eliminated the mis-match between the two  pieces. This way, the additional pieces provided the exact profile to transfer the profile to the main carving perfectly.

Once the outer profiles were established it was a simple matter of using a compass to transfer the width of the bowls to the design accurately by using the previously defined outer edges to use as a gauge to allow me to use the compass.

May seem complicated but it’s really very easy but requires frequent bit changes on the router as you switch from core box bits to clearancing bits and back again. The steps I used though eliminated much guess work, maintained accuracy as redrawing on the piece would have bee difficult and eliminated much hogging out of waste wood that would have been necessary had I not done it this way.

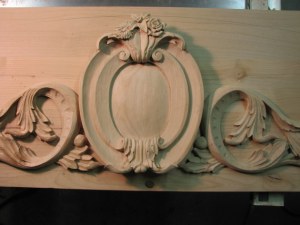
The cabinet company ,where this piece is now heading, gave me the panel that the carving is attached to. The designer asked if I could texture the background with chisel marks. Easy enough. Once I had the carvings completed I placed them on the panel and outlined them. Then I was able to use a shallow chisel to add the texture he asked for before gluing the carvings into place.


After drawing the basic design on a board I was able to use my router to start to establish the outside lines as well as the inner convex shape of the Medallion. I used a 1/4 inch bit to define the lines and a curved bit to clearance much of the waste wood.


As I worked the router I also used my chisels to keep defining the shapes I didn’t want to loose. This also gave me a good visual as to where I was heading.


Once the outer lines  and depth were established with the router I was able to use a compass to define the thickness of the “bowls” of the Medallion. You can also see the outside band saw line that I need to establish the outside perimeter of the Medallion.


Here I made the extra piece to be added to the original block and used it as the profile to transfer to the main panel prior to cutting it out thus ensuring a more accurate cutout.


Here you can see the lower section with the extra piece. Doing this also allowed me to have better access to the carvings needed on the main panel which wouldn’t have been accessible had I tried doing it out of one big piece. Also, there would have been quite a bit of wood that would have to be removed had I decided not to add wood but try doing it all out of one piece.


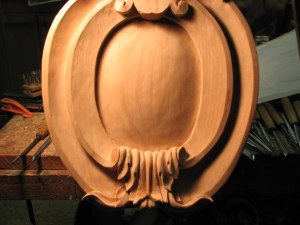
The upper section has only been roughed in but the lower section has had enough carving to be able to see what the design will be.


The bottom section is pretty much done at this point


Starting to rough in the upper flower design.


Moving along to the Daffodil. All just being roughed in at this point.


The three flowers, one for each of the birth months of the father , mother and their child.


The medallion at the point of needing some sanding.


Here I finished the carvings and attached the pieces to the board that will fit into the custom cabinets.