Portable Carving Bench
many carvers don´t have much space to carve, like me, and still like to have a sturdy bench, just for their carving. i have read several articles about making carving benches, and was unsure if i could do that, because i have not yet woodworking skills…but, given the price a good carving bench does cost here in germany, i thought its worth a try, so i decided to use a portable carving bench chris pye proposed in a book as a starting point.(please click images for larger view)
 |
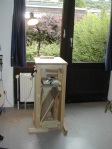
this is the carving bench just assembled, already different than the one in pye´s book, since i wanted a bigger workarea and i did not built in the more complicated things, but the basic is from his idea. the bench is made to be comfortable for my height, and is 90cm high. the workarea measures 40x40cm. i used wood glue and a lot of screws to assemble it. i actually did cut some of those “woodworkers joints” for more stability, you can see on the front legs at the bottom two of them… |
 |
this is the first time i used it, the carving on the bench is love, btw in very early stage. the area below i used to put wood inside, so its function is storage and give additional weight to the bench.
but after a time, this did not work too well. the problem was, the floor is not absolutely flat, and the bench wobbled around when doing mallet work. the bench in itself was pretty sturdy. i figured the problem is the boards underneath,,, so … |
 |
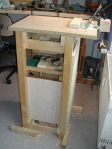
…i removed that board (oh that was work, i had fixed it with 40 screws…), and put the boards on the side for more stability, and put some wooden blogs besides the legs in a windmill fashion to enlarge the standing area. furthermore, i found 40x40cm workarea too small still, and replaced it by a plywood 42x60cm. i added a small shelf (green) for putting things.
now the bench is truly sturdy, and with the wood in the lower shelf it is heavy enough to stay still even under heavy mallet work. |
 |
front view of bench |
 |
right side of bench is open. i have a bookrest installed at the workarea, that is the green thingy,,,ah no i do not read while carving, but i put m references there so i have them to look all the time. … and i have made an armature to hold a lamp with a swinging arm at the end of the workarea. the backside is closed with a wooden board. |
 |
left side of bench is closed, and i use that to store c-clamps when i don´t use them… |
the material for bench was cheap, all wood and screws did cost less than 30 euro (a carving bench similar to this one is for sell here in germany for 700 euro ! but it is better wood, namely oak) , and the assembly was not really difficult, only it needed that i saw rather precise. but even though that did not always was the case, the bench works…
so i hope this inspires you to try building yourself a small bench when you have no space for a shop or a big bench … and, the weight of the empty bench is still low enough that one can carry it, for example outdoors to carve in fresh air or into a closet after carving to remove it from view if that is wished….

Joseph Bergey
Dec 13, 2009 @ 04:49:47
Hey there – great bench… just wondering if carving on a flat plane becomes bothersome to your neck and/or back… I’m trying to get the nerve up to build something similar or modify the traditional bench I have now so that I don’t have to bend over or look down so much… I’d like to be able to have something that’s on an incline in front of me although I’m still new at this and have never tried carving at such an angle and height…
Great work though – I’ve followed your carvings for a little while now and your works never fail to simply astonish me.
dorisfiebig
Dec 13, 2009 @ 10:13:26
hi joseph, sure you can change this design to make the table incline. i did not find it necessary for the bas reliefs, for example, i carved, as the height of the bench is pretty big, so i don´t need lean over. just look down, and i did not find this bends my neck much….the good thing when you built your own bench is, you can always modify and improve it, mine has received a lot of finetuning already. there is always something one can improve…
john
Mar 17, 2010 @ 14:52:55
Aye Doris that might be the way for me to go. As I age I find holding the bigger carvings by hand can be tiring. I ordered a Veratis vise from Axminster. The old Workmate I have can be hightened so I’ll try that first with the vise mounted. If that is unsatisfactory I’ll look at this idea again.
Vielen Dank
John
dorisfiebig
Mar 17, 2010 @ 22:14:13
hello john, i believe you will experience much more pleasure in carving when you fix the piece instead of holding it by hand. first, as you said, it is tiring to hold by hand. but more important to me is, you get both hands free if you fix the piece somehow, and this freedom of hands gives you so much more control over your tools, you will find your tools seem sharper, and you can do much more accurate cuts, cuts which travel the path you really intended and end where you wanted them end… so, i am glad you start with a vise. i don´t know this one, but i am sure it is good direction…and the bench,,,mine is nice, but it has transformed over time already, since i like to improve it all the time.,,so, in case you look my idea, take what you feel is good for you, and change all other to your needs. i am glad if i could inspire you.
john
Mar 22, 2010 @ 02:45:14
My imitial results are good. I’ve two carvings I roughed out on the vise and it appears to be easier physically. However early days yet.
dorisfiebig
Mar 22, 2010 @ 07:29:06
good news, john, glad to hear you like the first tries with vise. thank you for sharing